


Microsoft Teams is constantly evolving, as Microsoft develops new features to improve its collaboration and Teams meeting capabilities. A significant new feature allows users to set up ‘breakout rooms’ during meetings. In this blog we explain when and how to use this great new feature.
What are Teams breakout rooms?
A bit like during in person training, it’s sometimes great to be able to break down a large group into smaller discussion groups. With so many meetings and training events now happening online, Microsoft have added the ability to split your meeting participants into up to 50 separate virtual breakout rooms. The meeting organiser can easily move between whole group and break outs, without attendees having to use different meeting links.
Why should you use Teams breakout rooms?
Large Teams meetings are great for town hall style briefings, but they don’t lend themselves to constructive discussions, the breakout room feature means you can split your team in to small groups, and as the meeting host you can move between virtual rooms. Files created or worked on in the breakout rooms can be shared in the main meeting and meeting chat so everyone can access them.
How to enable breakout rooms in Teams
Before creating breakout rooms in Teams, the ‘new meeting experience’ will need to be enabled. To do this, you should ensure you are using the latest Teams update and then follow the steps below
- Click on your profile (your initials or image in the top right) and choose ‘settings’
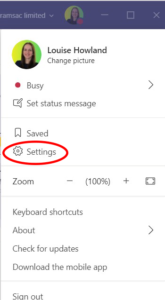
- On the General tab in Settings, select Turn on new meeting experience
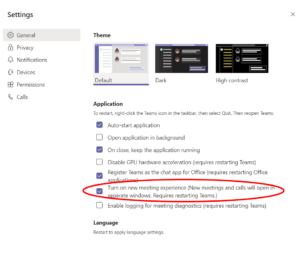
- To enable this change you will need to restart Teams.
How to use breakout rooms in Teams
There are some basic guidelines and points worth noting when using breakout rooms in Teams:
- Only the meeting organiser can create, rename and delete breakout rooms, it is not possible to transfer or share organiser capabilities.
- The organiser must be using the Teams desktop client to create and manage breakout rooms and participants.
- Meeting attendees and presenters will not have visibility of breakout rooms option.
- Breakout rooms cannot be set up before a meeting they must be created after the meeting has started.
- The organiser can join breakout sessions, send announcements to breakout rooms and move participants between breakout rooms or back to the main meeting as needed.
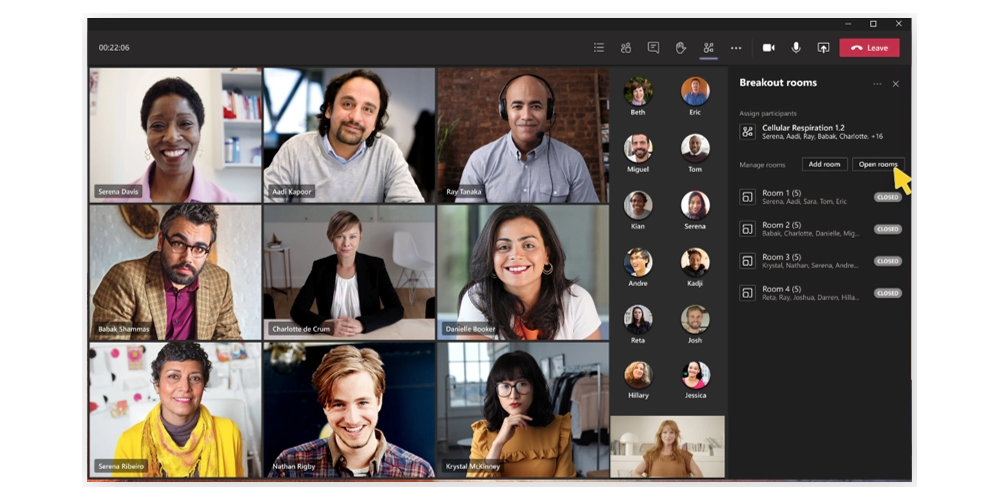
Setting up breakout rooms
1) Start the meeting in the Teams desktop client and click on the breakout room icon.
2) Select the number of breakout rooms required and how you would like to assign participants
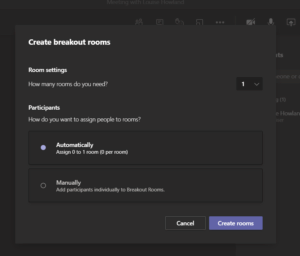
- Automatically – means that Teams will randomly assign the participants across the number of breakout rooms you select
- Manually – gives you the ability to determine who works with who
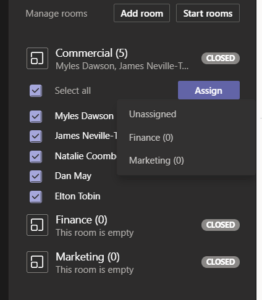
3) Click ‘create rooms’, a window will appear on the right hand side where you can manage the rooms, including renaming rooms, changing the status of rooms (open or closed) and assigning participants to rooms.
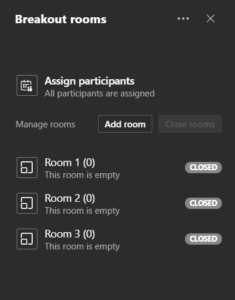
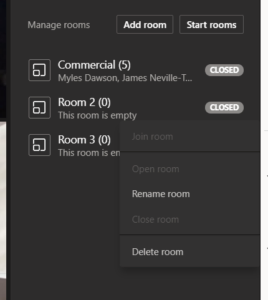
4) If you hover over the word closed, 3 dots appear, allowing you to join, open, rename or close a room
5) Once you have added participants you can manually move/assign participants to a room by clicking on the box next to the name of the participant you want to move, select ‘Assign’ and choose any room you want to place them in. Participants who have not yet been assigned to a room will appear under the ‘Assign participants’ section. (If a room is deleted, assigned participants will be moved to the list of unassigned participants.)
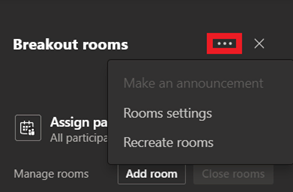
6) Additional room settings are available by clicking on the 3 dots next at the top. Here you can make announcements (A text-based announcement that will appear in all rooms, for example letting people know they have 5 minutes to round up their conversations). In Rooms Settings you can choose to automatically move people into opened rooms and allow people to move between the main room and the breakout room. You can also recreate rooms.
7) As the organiser, you can then move from room to room yourself, so you can check up on the progress of your participants. To join a breakout room, hover over the word ‘open’ next to the room title and select join room
8) At the end of a meeting, if the rooms are left open and the meeting is recurring the settings will be saved for the next meeting. If the rooms are closed the rooms chats become read only and the settings are not saved for future meetings
How to use Teams
In our short demo vlog, learn how to use Microsoft Teams for chatting to colleagues and scheduling video calls with people both inside and outside your organisation